Table of contents
INTRODUCTION
In today's digital world, web application development is becoming increasingly vital. It allows firms to reach a larger audience while also streamlining their processes. As a result, an increasing number of businesses are investing in custom web apps to satisfy their unique requirements.
What Is Nest JS
NestJS is a growing framework for making server-side applications using NodeJS. By default it makes use of ExpressJS platform and can be configured to make use of Fastify, it combines features of both object-oriented programming and functional programming. It uses TypeScript during initialization, but it may easily be configured to utilize plain JavaScript. It has a similar structure and organization to AngularJS.
NestJS is a really good tool for building projects with scalability in mind. It helps you start your project quickly and it's also easy to understand because it's organized in a way that makes sense.
Overview of NestJS architecture and modules
The framework is designed using a modular architecture, which means it is made up of smaller, reusable pieces known as modules. These modules interact to provide the functionality necessary for the development of a complete application. Think of the modules in NestJS as lego blocks. When you put these blocks together, they make a big structure, like a house or a bridge. In NestJS, we use different modules to make a web application. You can easily add or remove modules to change what your application can do. It's like playing with lego toys, but instead of making a toy, you make a web application!
You might ask what exactly do these modules contain, well in nestjs modular architecture they may include things like the;
Controller in a NestJS module helps to handle requests from a user and send back the right response. It acts like a middleman between the client and the server. A Controller has different places to go to, called endpoints, each with a unique address and way to communicate like GET, POST, PUT, and DELETE which are referred to as HTTP Methods.
Service is like a helper that handles business logic and helps the Controller do its job. The Controller talks to the customers, but the Service helps it do the work by doing things like talking to the computer database and making sure everything runs smoothly. Services can be used by different parts of the program, making it easier to manage and take care of the code.
Provider allows you to connect to other systems such as a database or external systems. Consider it a unique employee who assists you in obtaining information from outside your program so that you may utilize it to improve your online application.
These components work in unison to create a fully working web application.
Prerequisite
Knowledge of JavaScript and a Basic Understanding of TypeScript.
Node Installed.
Understanding of Object-Oriented Programming and different Data Types.
Setting up a development environment for NestJS
Setting up a NestJS application for development is simple. NestJS has a special command line that helps you create your project quickly using just a few simple commands. This makes starting your project and getting your ideas off the ground even easier.
To get started, if you are making use of a windows system open Command Prompt or Windows PowerShell and enter this command below.
npm i -g @nestjs/cli
if you are making use of a Linux Distribution, open your Terminal and run this command below.
sudo npm i -g @nestjs/cli
Wait for the installation to complete.
Verify that the NestJS CLI has been installed by running this command below. When it outputs the version then you know you have successfully installed the Nestjs Command-Line to your system.
nest --version
Creating your first NestJS application
Now that you have installed and set up NestJs on your system, let's go on to create a Simple REST API with NestJs NestJs has some special CLI commands that can help you quickly bootstrap your project, to get started on your terminal you will enter this command below.
nest new task-api
A selection field will appear for you to select the package manager to be used, either one of NPM, YARN or PNPM.
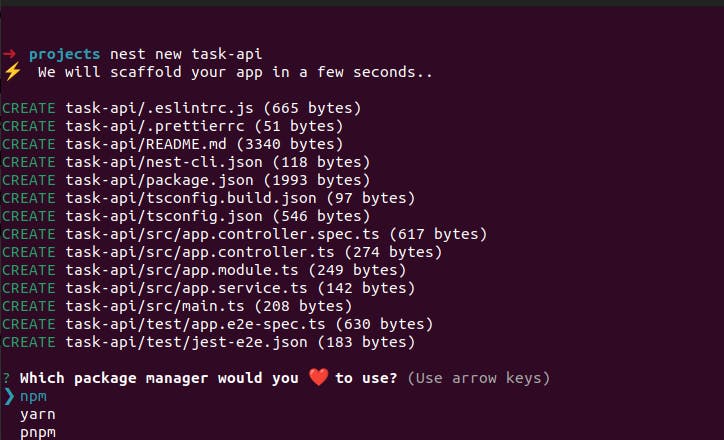
You can select the package manager of your choice, I recommend NPM for this article, and then installation of the packages for the project build-up continues.
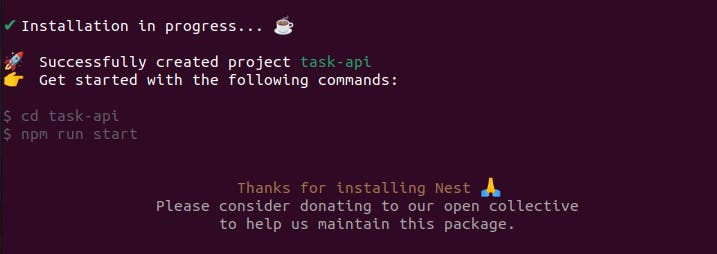
After completion, a skeleton project is generated that includes some configuration files, an example of a GET request, and test cases for it. You then navigate to the folder created by this command.
cd task-api
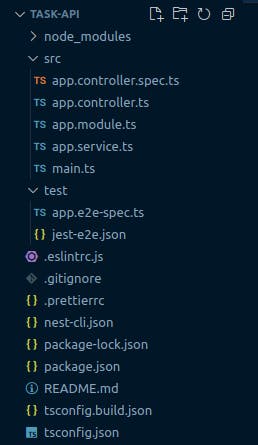
The folder structure should appear like this when you open this project folder in your editor (vs code).
The NestJs CLI includes a special command to rapidly spin up a REST api project using the nest create resource as you are constructing a task project, so you input the command in your terminal now as you go on to produce the resource such as services, controllers, Entities, Modules, DTOs, etc.
nest generate resource task
Some choice fields will display on the desired transport layer, which is REST API, and if you wish to produce CRUD entry points.
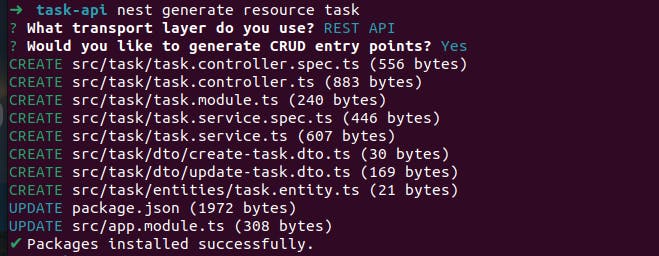
In your editor, you will see the task folder has been added with some subfolders and files and also that it has updated the root appModule appropriately.
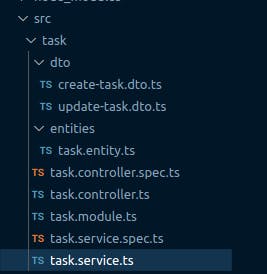
For this project, you will use SQLite database with TypeOrm to connect to it. You will then install these packages using this below.
npm install --save @nestjs/typeorm typeorm sqlite3 class-validator
After it has been installed you then open your editor and make changes to your codes by importing the TypeOrmModule into the root AppModule.
Adding a data source with TypeORM and creating entities
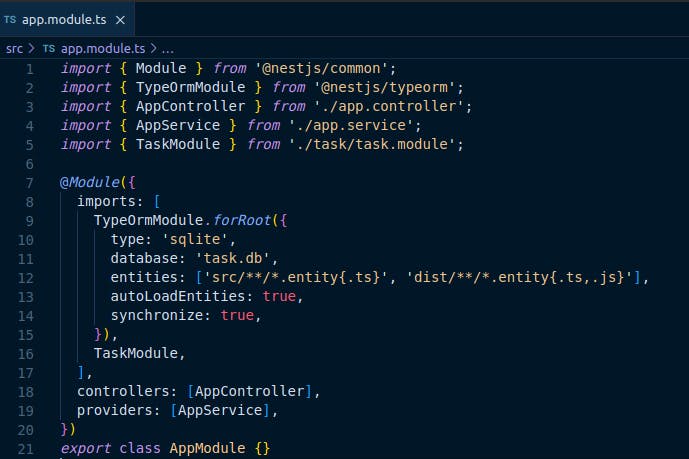
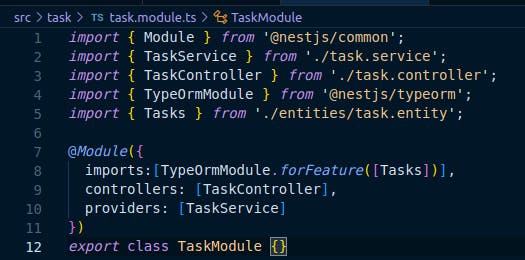
Also adding the entity to the taskModule file through TypeOrmModule.
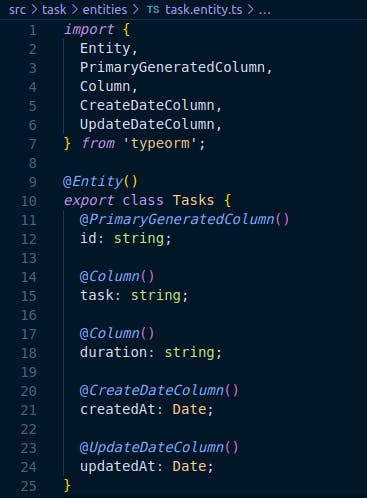
Then next you define the columns or items that should make up your task list in the entity file like this below.
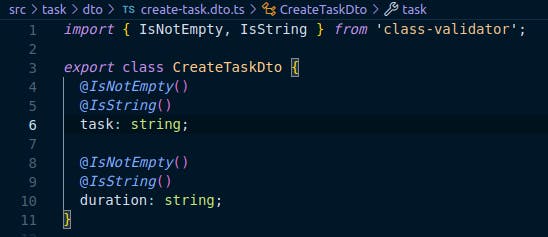
And you also define the columns for validation in your DTO file.
Creating a simple REST API
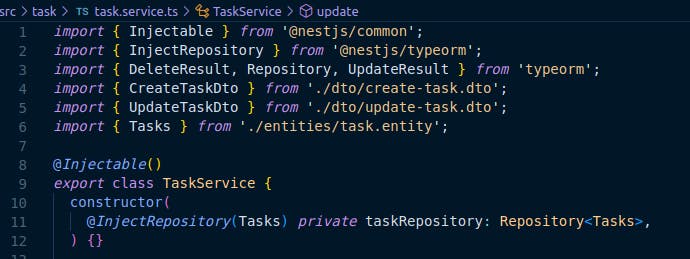
The database repository is then added to the task service by importing InjectRepository and Repository in a constructor.
You then proceed to create the first method needed for your project which is an Instance of a POST request.
 createTask(createTaskDto: CreateTaskDto): Promise<Tasks> {
    const data = new Tasks();
    data.task = createTaskDto.task;
    data.duration = createTaskDto.duration;
    return this.taskRepository.save(data);
  }
This method creates a task, it takes in an object named CreateTaskDto as a parameter. This object includes the information needed to make the task. The method then creates the task using the data from CreateTaskDto and saves it to our database.
You then create a route for it in our task.controller.ts file.
  @Post()
  async create(@Body() createTaskDto: CreateTaskDto, @Res() res, @Next() next) {
    try {
      const task = await this.taskService.createTask(createTaskDto);
      return res.status(HttpStatus.OK).json({
        success: true,
        data: task,
        message: 'Task Created',
      });
    } catch (error) {
      next(error);
    }
  }
You first add in the @POST decorator to ensure it uses the HTTPS Method, function begins by trying to create a task with the taskService.createTask method and the createTaskDto argument. If the task is successfully generated, the function returns to the client with a success status, a message, and the newly formed task's data.
Then you go on to create the findOne which queries our database and returns a single task via it's ID .
 async findOne(id: string): Promise<Tasks> {
    const data = await this.taskRepository.findOne({ where: { id } });
    if (data) {
      return data;
    }
    throw new NotFoundException('Task Not Found');
  }
Then you create the corresponding route in your controller for this service method.
 @Get(':id')
  async findOne(@Param('id') id: string, @Res() res, @Next() next) {
    try {
      const task = await this.taskService.findOne(id);
      return res.status(HttpStatus.OK).json({
        success: true,
        data: task,
        message: 'Task Available',
      });
    } catch (error) {
      next(error);
    }
    this.taskService.findOne(id);
  }
Here you create a function in the Controller that will handle a GET request to the route "tasks/:id". The @Get decorator tells NestJS to expect a GET request and the ':id' part is a placeholder for a specific task ID.
You then proceed to create a findAll method in our service to be able to fetch all tasks saved to our SQLite database.
 async findAll(): Promise<Tasks[]> {
    const datas = this.taskRepository.find();
    if (datas) {
      return datas;
    }
    throw new NotFoundException('Tasks Not Found')
  }
You then create a controller function that implements this service.
@Get()
  async findAll(@Res() res, @Next() next) {
    try {
      const tasks = await this.taskService.findAll();
      return res.status(HttpStatus.OK).json({
        success: true,
        data: tasks,
        message: 'List Of Task Available',
      });
    } catch (error) {
      next(error);
    }
  }
It is similar to the findOne function, but it does not require an ID to be provided in and it does not limit the number of tasks it retrieves. To implement the update function in our service, you supply two arguments: the id to find the specific task and the updateTaskDto, which acts as the body that modifies the task, followed by a return. The promise of an updateResult .
 async update(id: string, updateTaskDto: UpdateTaskDto): Promise<UpdateResult> {
    const data = await this.taskRepository.update(id, updateTaskDto);
    if (data.affected === 0) {
      throw new NotFoundException('Task Not Found');
    }
    return data;
  }
You then also make a route for it in your controller file below.
@Patch(':id')
  async update(
    @Param('id') id: string,
    @Body() updateTaskDto: UpdateTaskDto,
    @Res() res,
    @Next() next,
  ) {
    try {
      await this.taskService.update(id, updateTaskDto);
      const updatedTask = await this.taskService.findOne(id)
      return res.status(HttpStatus.OK).json({
        success: true,
        data: updatedTask,
        message: 'Task Updated',
      });
    } catch (error) {
      next(error);
    }
  }
Here the method updates a task with information supplied in the updateTaskDto. If successful, it receives the updated task data by executing the findOne method on taskService and supplying the id. Finally, it sends a response back to the client with a status of "OK" and a JSON object that contains information on the success of the operation, the updated task data, and a message that states "Task Updated". In case of failures throughout the procedure, the technique includes error handling by utilizing the try-catch statement and the next function.
Then finally you create the delete method in the task service, here you pass in the ID as the argument, that enables the method to query the database and find a particular task that is to be deleted, if it's not found it throws an error.
async delete(id: string): Promise<{ success: boolean }> {
    const data = await this.taskRepository.delete(id);
    if (data.affected) {
      return { success: true };
    } else {
      throw new NotFoundException('Task Not Found');
    }
  }
You create the route for this in the controller file below.
 @Delete(':id')
  async remove(@Param('id') id: string, @Res() res, @Next() next) {
    try {
      const task = await this.taskService.delete(id);
      return res.status(HttpStatus.OK).json({
        success: true,
        data: task,
        message: 'Task Deleted',
      });
    } catch (error) {
      next(error);
    }
  }
The @Delete decorator provides the endpoint responsible for handling deletion requests. The endpoint gives the task's ID as an argument to the delete method.
The taskService is used by the remove function to delete the task with the provided ID. If the deletion is successful, the method produces a JSON response with the "success" field set to true and the message "Task Deleted" set to true.
Testing the REST API using Postman
Great! you've implemented a REST API, now head over to Postman and test out these endpoints to see how they work.
You then select a method, to create you will make use of POST then you provide the route, in the image below it is 127.0.0.1:3000 but it can also be localhost:3000 , In body you select raw and choose JSON then you give a JSON input in the box, here the body requests for a task and duration key and the value should be in a string.
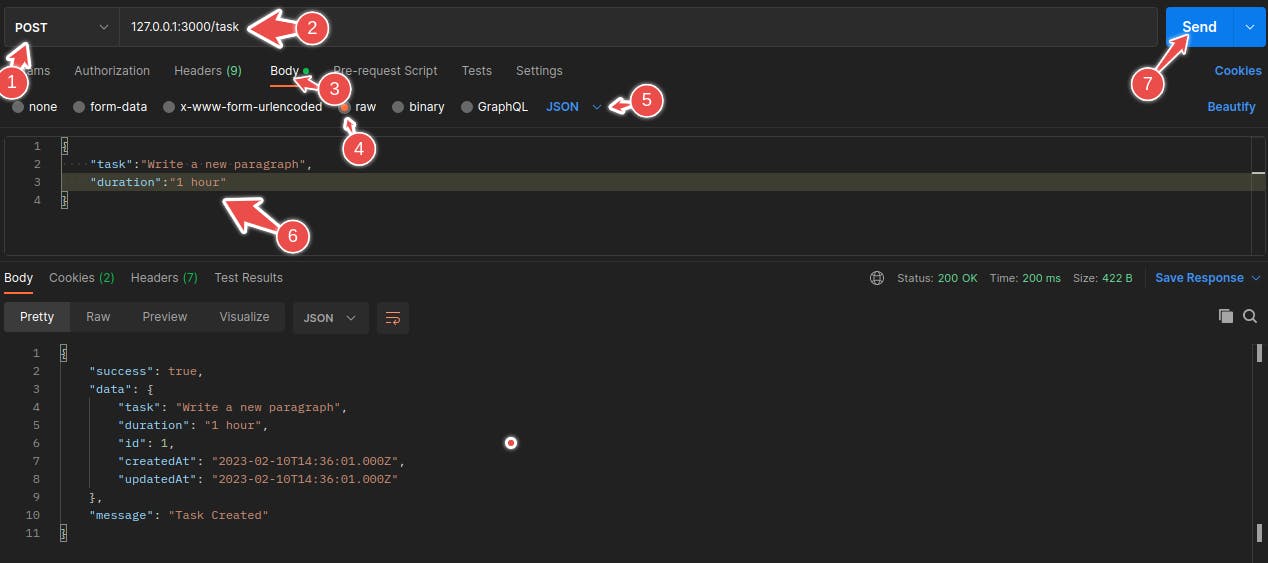
Then you will get back a response with status 200, the entry has been saved to the SQLite database, To test the findOne endpoint, you switch the method to a GET .
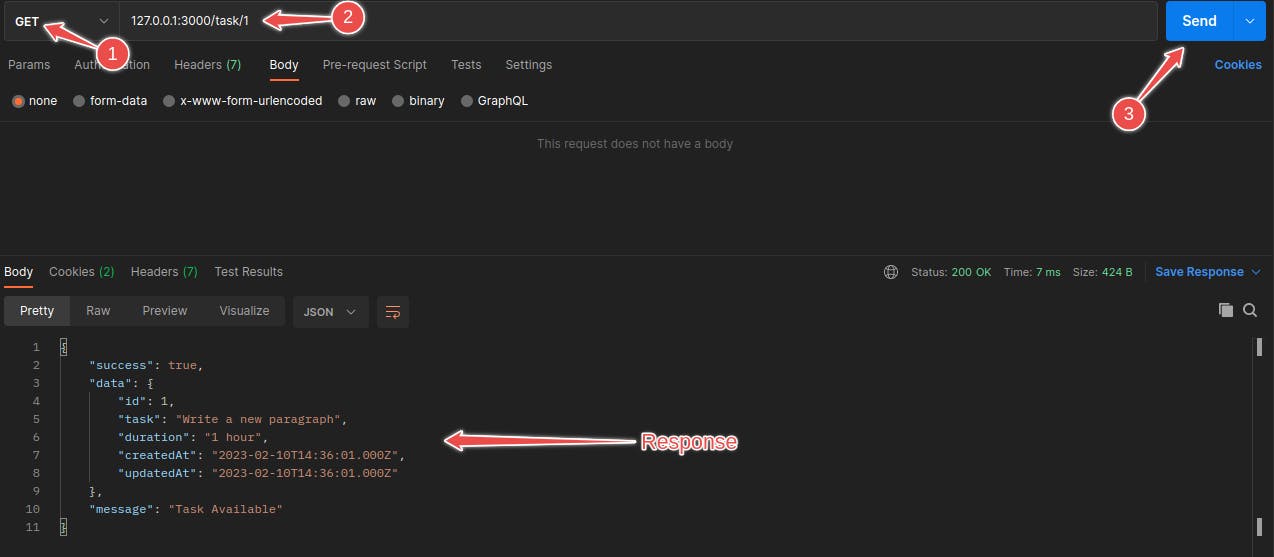
Then you try out the findAll next, it's also a GET request,
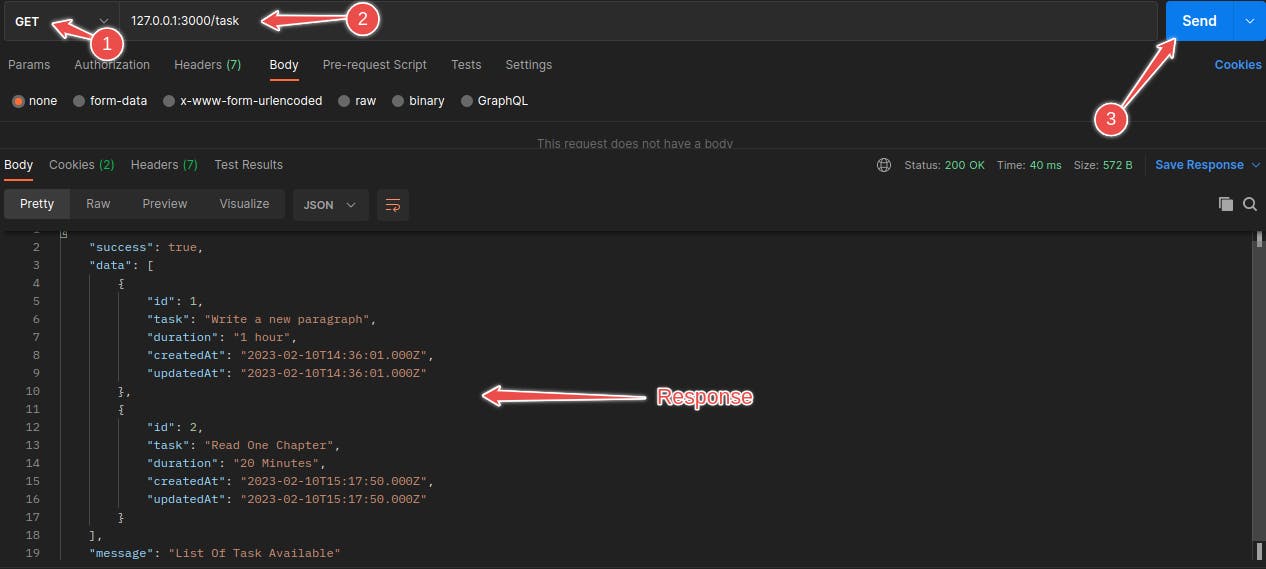
you can see that it brought out more than one response, and it doesn't need an ID parameter to fetch these data.
Next, you try the update the route, here it needs an Id to be provided to query the database and also new JSON data as the body that updates the fetched data.
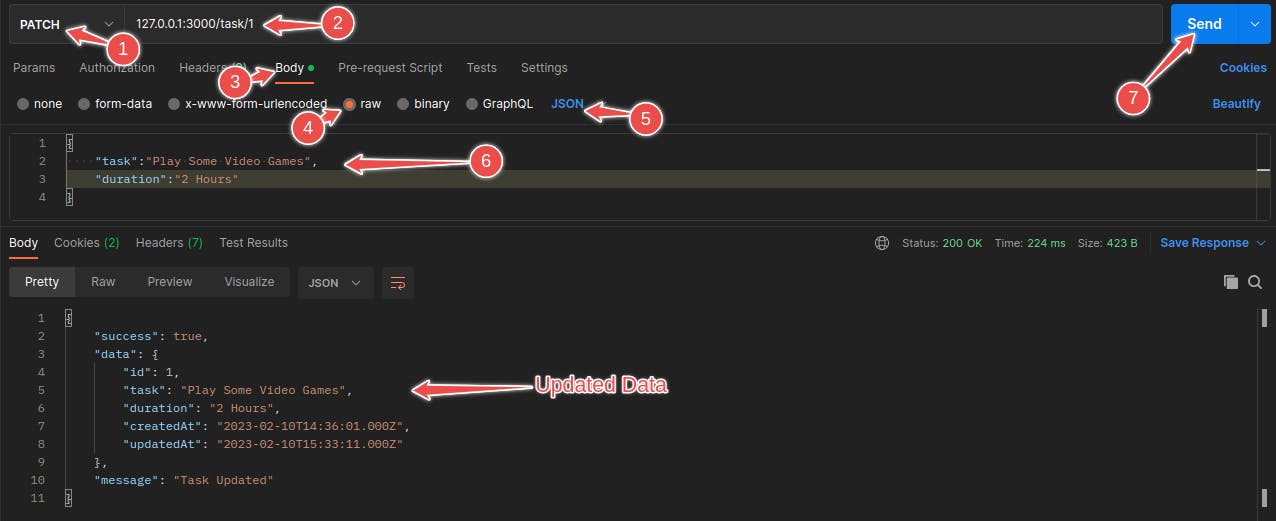
Then now finally test the delete route, it requires you passing in an ID as a parameter and setting the HTTP method to delete.

You set up error handlers so that you can always appropriately detect any error that arises while sending requests using the various HTTP protocols.
Conclusion
Finally, Nest.js is a robust and flexible framework for creating scalable and effective server-side applications. It is built on top of well-known technologies like Node.js and TypeScript and offers a strong basis for creating RESTful APIs.
We've now covered the fundamentals of using TypeScript and NestJS to build a simple task project. We have spoken about utilizing the NestJS framework to construct various CRUD operations and handle errors. Separation of concerns is ensured and the management of the program is made simpler by the use of dependency injection and the modular pattern. With the information from this tutorial, you may create more reliable and scalable apps and continue to learn TypeScript and the NestJS framework.
I hope this article has been a valuable introduction to Nest.js for beginners. If you have found it helpful and would like to stay up to date with my future writing, be sure to subscribe or follow me [Okoye Chukwuebuka Victor] for more exciting articles. Thank you for your time and I look forward to bringing you more great content in the future!.

